Monday, April 4, 2016

Back At It - Gutting the Interior

After much delay, I have moved Hydra onto a trailer and to my yard at home. I've decided to go all in and completely restore the boat, from a bare hull. While not my original plan, it quickly became apparent, the deeper I got into the boat, that there was so many problems that it would be easier just to gut the thing and start fresh. I'm probably crazy. Here's the interior completely gutted and stripped.


New mast compression post temporarily installed (VG doug fir). Tick-board tacked to post for new main bulkhead,


Monday, October 14, 2013

Filling and Fairing the Hull

Here we are in October. Its taken six months of weekends to fully strip and refill all the ground out blisters in the hull. A total of three filling and fairing episodes were required to get the bottom back to mostly fair. Large blisters and all thru hull holes were glassed in. All remaining blisters were initially filled with an epoxy and colloidal silica mixture. Then I faired with an epoxy/microballoon mix. During the last pass, I got frustrated with the work-ability of the Raka epoxy/microballoon mixture since I could struggled to achieve the right consistency, and then it would quickly change, despite using a slow hardener.   Finally, I bit the bullet and bought 2 gallons of Awlfair. Super pricey, but SO much easier to work with and sands great, though clogs sandpaper quickly. Shoulda went with Awlfair from the get-go Now, we are ready to barrier coat. Here she is ready for the barrier, which will be 6-10 coats of Raka epoxy.

I'll tint the fist three coats black, then stop to re-apply yet more filler to address any remaining unfairness. I've got most of what I can feel by touch, but the blotchy bottom makes eye-sighting any remaining issues difficult. I'm hoping the black barrier coat and a light held at a low angle at night will highlight remaining areas that need addressing, Then the remaining barrier coats will go on....then thru hulls...then bottom paint. As if six months of tedious sanding and being coated in fiberglass dust wasn't enough, I've decided I might as well paint the topsides and deck too. Lots more work, but she'll be a thing of beauty...someday.

Friday, May 24, 2013

Haul Out and Blister Blues

Time for the first haul out. After arranging for a haul out with the yard, we brought the boat over with the dinghy tied alongside, since the motor had been removed by me earlier. As soon as the boat came out it became apparent that the boat has a serious blister problem...the dreaded boat pox.


 After doing tons of reading, research, and internet searching, I at first decided I really didn't want to remove the entire gelcoat since I was worried about how much work re-fairing the hull would entail. So I decided to first grind out all the blisters, then remove all the bottom paint. Large areas of bottom paint were already flaking and chipping off, suggesting poor adhesion of the first coat during a previous bottom job. The paint removal was an absolutely horrible job. First I tried sanding it off, but the toxic dust was horrible and it was way too slow. I didn't want to use a heavier grit grinder because I was worried about gouging too much of the gelcoat.

Ultimately, I used a cabinet scraper, assisted by some heavy duty paint remover, to hand scape the whole boat free of paint, one 2 inch strip at a time. I could barely raise my arms above my head for a few days after that. Had I only known.....
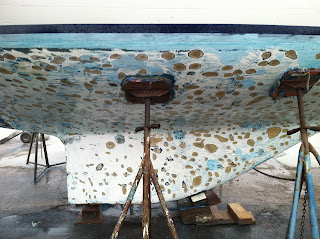


These pics show just how many blisters I had. Most of them were only into the first mat layer under the gelcoat, so thankfully I don't believe I have a serious delamination issue.


Blister everywhere! Of course, once I had stripped the paint and ground out the thousands of blisters, doubt set in. How wet is the laminate? should I dry the whole boat and barrier coat the bottom? Will the boat dry without stripping the gelcoat? How many liquid filled blisters remained under the gelcoat unseen?

Finally, with much agonizing, I decided to just strip the whole damn thing and do it the right way. The bummer is, had I known I would take the gelcoat down originally, I wouldn't have wasted a month scraping paint and grinding out blisters, not to mention all the scraping exhaustion!


Gelcoat stripped using a right angle grinder with a 7" 24 grit disk. Took about 10 hrs to do the whole thing, mostly because my arms started giving out on day 2, so I took lots of breaks. Once removed, hundreds, maybe thousands, more dime to nickle sized "voids", areas where the mat didn't wet out completely, were obvious. These would have been blisters waiting to happen.

So now the plan is to completely dry the hull, fair, and barrier coat with epoxy. Lots of work ahead of me.


Friday, January 4, 2013

And so it begins...

The Boat:
I recently acquired a 1978 Ericson 31 Independence, hull #29. She is called HYDRA.
The Project:
This blog will chronicle the extensive refitting I will be undertaking to get HYDRA ready for bluewater cruising. HYDRA sat unattended and neglected for at least five years and is in need of a lot of refurbishing.
The Dream
My hope is to have her cruising California's Channel Islands by summer 2013. After that, Mexico or beyond!
The Philosophy
Go simple, go cheap, go soon.  I am a fan of Lin and Larry Pardey's style...go simple and its cheaper, have nothing onboard you cant repair yourself, be self sufficient.
http://www.landlpardey.com/